3. Install OpenStack
Now that we’ve installed and configured MAAS and successfully deployed a Juju controller, it’s time to do some real work; use Juju to deploy OpenStack, the leading open cloud platform.
We have two options when installing OpenStack:
- Install and configure each OpenStack component separately. Adding Ceph, Compute, Swift, RabbitMQ, Keystone and Neutron in this way allows you to see exactly what Juju and MAAS are doing, and consequently, gives you a better understanding of the underlying OpenStack deployment.
- Use a bundle to deploy OpenStack with a single command. A bundle is an encapsulation of a working deployment, including all configuration, resources and references. It allows you to effortlessly recreate a deployment with a single command or share that deployment with other Juju users.
If this is your first foray into MAAS, Juju and OpenStack territory, we’d recommend starting with the first option. This will give you a stronger foundation for maintaining and expanding the default deployment. Our instructions for this option continue below. Alternatively, jump to Deploying OpenStack as a bundle to learn about deploying as a bundle.
3.1. Deploy the Juju controller
Previously, we tested our MAAS and Juju configuration by deploying a new Juju controller called maas-controller. You can check this controller is still operational by typing juju status. With the Juju controller running, the output will look similar to the following:
Model    Controller       Cloud/Region  Version  SLA          Timestamp

default  maas-controller  mymaas        2.4.4    unsupported  15:04:54+03:00
If you need to remove and redeploy the controller, use the following two commands:
juju kill-controller maas-controller
juju bootstrap --constraints tags=juju mymaas maas-controller
During the bootstrap process, Juju will create a model called default, as shown in the output from juju status above. Models act as containers for applications, and Juju’s default model is great for experimentation.
We are going to create a new model called uos to hold our OpenStack deployment exclusively, making the entire deployment easier to manage and maintain.
To create a model called uos (and switch to it), simply type the following:
juju add-model test
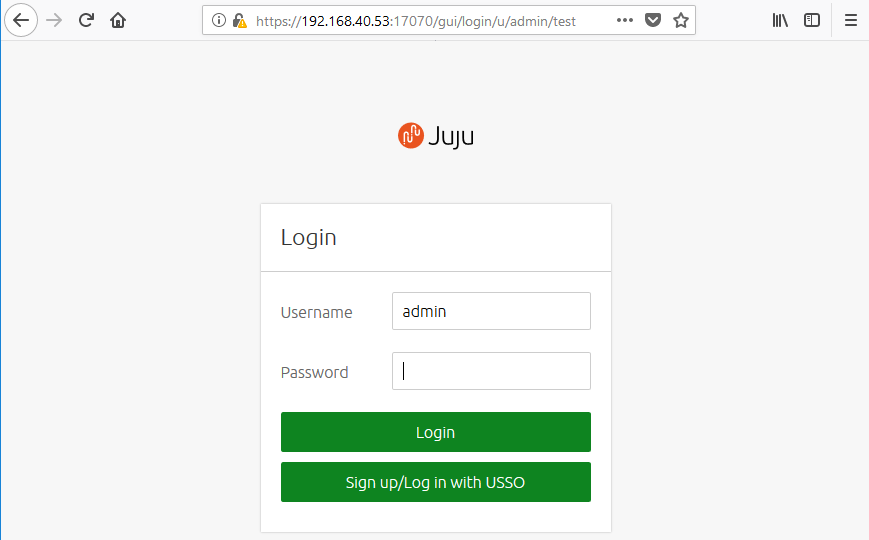
After you add a model you can browse the Web UI in Juju using command in your terminal:
       juju gui


Sled vuvejdaneto na komandata juju gui juju-to shte pokaje informaciq  kak da se lognem v syotveti[ model
Sushto i info za user-a i parolata
     GUI 2.14.0 for model "admin/test" is enabled at:
      https://192.168.40.53:17070/gui/u/admin/test
     Your login credential is:
      username: admin
      password: 67d4c5dbbb2c56990c3fdaab1d5a355c


Tova izglejda po sledniq nachin .
3.2. Deploy OpenStack
We are now going to step through adding the OpenStack components to the new model. The applications will be installed from the eniware-org/openstack-bundles repository. We’ll be providing the configuration for the charms as a yaml file which we include as we deploy it. When you Clone the repository to your juju machine, go to folder –stable/openstack-base
The configuration is held in the file called bundle.yaml. Deployment requires no further configuration than running the following command:
Note
Do not use autocomplete with Tab button
juju deploy bundle.yaml
You can see what Juju doing with command in terminal
watch juju status
koeto izglejda po sledniq nachin
Model  Controller       Cloud/Region  Version  SLA          Timestamp
test   maas-controller  mymaas        2.4.4    unsupported  16:23:02+03:00

App                    Version        Status       Scale  Charm                  Store       Rev  OS      Notes
ceph-mon                              waiting        2/3  ceph-mon               jujucharms   26  ubuntu
ceph-osd               13.2.1+dfsg1   blocked          3  ceph-osd               jujucharms  269  ubuntu
ceph-radosgw                          maintenance      1  ceph-radosgw           jujucharms  259  ubuntu
cinder                                waiting        0/1  cinder                 jujucharms  273  ubuntu
cinder-ceph                           waiting          0  cinder-ceph            jujucharms  234  ubuntu
glance                                waiting        0/1  glance                 jujucharms  268  ubuntu
keystone                              maintenance      1  keystone               jujucharms  283  ubuntu
mysql                  5.7.20-29.24   active           1  percona-cluster        jujucharms  269  ubuntu
neutron-api                           maintenance      1  neutron-api            jujucharms  262  ubuntu
neutron-gateway        13.0.1         waiting          1  neutron-gateway        jujucharms  253  ubuntu
neutron-openvswitch    13.0.1         waiting          3  neutron-openvswitch    jujucharms  251  ubuntu
nova-cloud-controller                 waiting        0/1  nova-cloud-controller  jujucharms  311  ubuntu
nova-compute           18.0.1         waiting          3  nova-compute           jujucharms  287  ubuntu
ntp                    4.2.8p10+dfsg  maintenance      4  ntp                    jujucharms   27  ubuntu
openstack-dashboard                   maintenance      1  openstack-dashboard    jujucharms  266  ubuntu
rabbitmq-server        3.6.10         active           1  rabbitmq-server        jujucharms   78  ubuntu

Unit                      Workload     Agent       Machine  Public address  Ports     Message
ceph-mon/0                maintenance  executing   1/lxd/0  192.168.40.110            (install) installing charm software
ceph-mon/1                waiting      allocating  2/lxd/0                            waiting for machine
ceph-mon/2*               maintenance  executing   3/lxd/0  192.168.40.105            (install) installing charm software
ceph-osd/0*               waiting      idle        1        192.168.40.58             Incomplete relation: monitor
ceph-osd/1                blocked      idle        2        192.168.40.59             Missing relation: monitor
ceph-osd/2                waiting      idle        3        192.168.40.101            Incomplete relation: monitor
ceph-radosgw/0*           maintenance  executing   0/lxd/0  192.168.40.103            (install) Installing radosgw packages
cinder/0                  waiting      allocating  1/lxd/1                            waiting for machine
glance/0                  waiting      allocating  2/lxd/1                            waiting for machine
keystone/0*               maintenance  executing   3/lxd/1  192.168.40.109            (install) installing charm software
mysql/0*                  active       idle        0/lxd/1  192.168.40.102  3306/tcp  Unit is ready
neutron-api/0*            maintenance  executing   1/lxd/2  192.168.40.108            (install) installing charm software
neutron-gateway/0*        waiting      idle        0        192.168.40.57             Incomplete relations: network-service, messaging
  ntp/0*                  active       idle                 192.168.40.57   123/udp   Ready
nova-cloud-controller/0   waiting      allocating  2/lxd/2                            waiting for machine
nova-compute/0*           waiting      idle        1        192.168.40.58             Incomplete relations: image, messaging, storage-backend
  neutron-openvswitch/0*  waiting      idle                 192.168.40.58             Incomplete relations: messaging
  ntp/1                   active       idle                 192.168.40.58   123/udp   Ready
nova-compute/1            waiting      executing   2        192.168.40.59             Incomplete relations: messaging, storage-backend, image
  neutron-openvswitch/2   maintenance  executing            192.168.40.59             (install) Installing apt packages
  ntp/3                   maintenance  executing            192.168.40.59             (install) installing charm software
nova-compute/2            waiting      executing   3        192.168.40.101            Incomplete relations: messaging, image, storage-backend
  neutron-openvswitch/1   maintenance  executing            192.168.40.101            (install) Installing apt packages
  ntp/2                   maintenance  executing            192.168.40.101            (install) installing charm software
openstack-dashboard/0*    maintenance  executing   3/lxd/2  192.168.40.106            (install) installing charm software
rabbitmq-server/0*        active       executing   0/lxd/2  192.168.40.104            (config-changed) Enabling queue mirroring

Machine  State    DNS             Inst id              Series  AZ       Message
0        started  192.168.40.57   skyhk8               bionic  default  Deployed
0/lxd/0  started  192.168.40.103  juju-4052d2-0-lxd-0  bionic  default  Container started
0/lxd/1  started  192.168.40.102  juju-4052d2-0-lxd-1  bionic  default  Container started
0/lxd/2  started  192.168.40.104  juju-4052d2-0-lxd-2  bionic  default  Container started
1        started  192.168.40.58   t678hy               bionic  default  Deployed
1/lxd/0  started  192.168.40.110  juju-4052d2-1-lxd-0  bionic  default  Container started
1/lxd/1  pending                  juju-4052d2-1-lxd-1  bionic  default  Container started
1/lxd/2  started  192.168.40.108  juju-4052d2-1-lxd-2  bionic  default  Container started
2        started  192.168.40.59   dsktqg               bionic  default  Deployed
The deployed yaml file includes the following applications:
|
|
|
|
|
|
|
|
|
|
|
|
|
|
|
|
Note
Remember, you can check on the status of a deployment using the juju status command. To see the status of a single charm of application, append the charm name. For example, for a Ceph OSD charm:
juju status ceph-osd
3.3. Test OpenStack
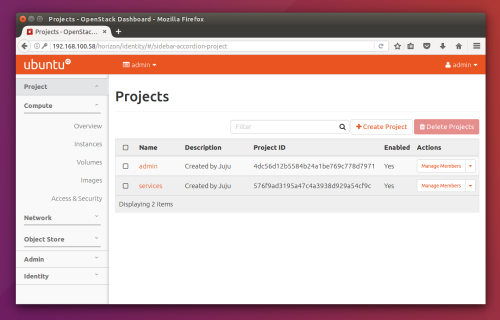
After everything has deployed and the output of juju status settles, you can check to make sure OpenStack is working by logging into the Horizon dashboard.
The quickest way to get the IP address for the dashboard is with the following command:
juju status --format=yaml openstack-dashboard | grep public-address | awk '{print $2}'
The URL will be http://<IP ADDRESS>/horizon. When you enter this into your browser you can login with admin and openstack, unless you changed the password in the configuration file.
If everything works, you will see something similar to the following:
3.4. Next steps
Congratulations, you’ve successfully deployed a working OpenStack environment using both Juju and MAAS. The next step is to configure OpenStack for use within a production environment.